The infamous murder weapon from Texas Chainsaw Massacre is actually an innocent power tool used by Lumberjacks and other people in the wood business.
 Its sharp teeth-like structure helps take down trees, cut wood, prune hedges, etc.
Like any other machine, this needs maintenance and replacements to keep working for a long time.
There could be multiple reasons why your chainsaw isn’t working properly. From loosened chains to damaged teeth, from a damaged wire to no spark, it could be anything.
But if the issue is with its coil you are at the right place. This article, therefore, covers all aspects of how to test a chainsaw coil.
To use or repair this tool requires proper safety precautions. Major must-follow measures are:
- Wear working gloves
- Wear goggles.
- Power-off the chainsaw.
- Place the chainsaw on the proper work table.
- Let the tool cool down before doing anything.
- Have all your tools gathered.
- Read the user manual.
Symptoms of a Bad Chainsaw Coil
It’s best practice to locate the issue before getting your hands dirty with work. As mentioned, there could be a number of reasons that your chainsaw is not working properly but if the issue is coil-related it might be one of the following:
- Difficult to start. Have to do it repeatedly.
- Stop working when it gets hot.
- Spluttering sounds.
- Unusual vibration or jerking.
- Multimeter showing the reading 0 or close to zero.
Required Tools to Test Chainsaw Coil
It is best to have all the necessary tools when working with a machine. Following tools should be gathered before dealing with the coil of the chainsaw
- Spark plug wrench or socket wench
- Screwdriver
- Multimeter
- A tiny brush.
- Piece of cloth
- New spark plug.
Chainsaw Ignition Coil and Its Checking
The ignition coil is one of the first things you should check when your chainsaw isn’t working properly. It is what allows electricity to transmit to the spark plug. The spark plug on receiving ignites the fuel making the chainsaw run.
How to Test a Chainsaw Coil in 3 Easy Steps?
Whether to test the coil with a multimeter or without the multimeter you first need to locate the ignition coil. And even before that, you must have your safety measures on.
Step 1: Locating the spark plug
Each chainsaw is different and the answer to where its spark plug is located is in the user manual. In case you lost it your best bet could be is to first let cool down and then
- Turn the ignition button off.
- Twist the lock on the covering and gently take it off
- It could be either behind or above the air filter.
- Remove the protective cover behind the air filter to reveal the spark plug wire.
- Remove the spark plug wire or rubber boot to reveal the spark plug.
Step 2: Removing the spark plug
Before directly moving to the coil it’s good to check the spark plug. It needs to be removed anyway to test the ignition coil so why not check it? Because sometimes this could be the problem
- Remove the rubber boot from the spark plug by twisting and pulling it gently.
- Place the wrench on the plug and rotate anti-clockwise to unscrew and detach it.
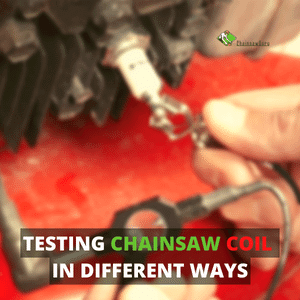
Step 3: Testing the Ignition coil
Be careful with the spark plug as its exposed tip is dangerous. It contains electrodes that generate electricity. You can perform two tests to see if the coil is working or not.
Test 01
- Clean the spark plug with a brush in case any dust or debris is affecting its working.
- Carefully put the rubber boot back on it.
- Have its tip pressed against a metal surface.
- Turn the ignition switch on.
- Pull the starter cord with force. You can dim out the light to see a proper spark.
- If a spark is formed on the pressed surface, it means that the ignition coil is working properly if not it could be the coil or the spark plug.
- Perform this test on a new spark plug.
- If you see a spark it means the issue was the spark plug.
- If there is no spark on the new spark plug then the problem is with the coil.
Test 02
Sometimes you might get a spark on a cooled-down chainsaw with a damaged coil. So to make sure that the coil is the issue
- Remove the recoil or cover on the engine to get to the coil using a screwdriver.
- For a double-cylinder chainsaw, it could be on any side so check both.
- Disconnect the kill wire attached to the ignition coil. This will isolate the coil from all of the wirings.
- Reattach the recoil and perform test 01 again.
- In this case absence of a spark is the absolute indication of a damaged coil.
- But if you do see the spark the problem could be with the wiring or kill switch.
How to Test Chainsaw Coil with a Multimeter?
To use the multimeter for testing the coil first go through precautions, requirements, and step 01 and, 02 from above. Locate the coil on the engine by removing the recoil or cover. For a double-cylinder chainsaw check both sides. Once the spark plug is removed and the coil is located
Step 1: Remove the Coil
- Locate the coil.
- Remove the Torx screw using a screwdriver.
- Disconnect the kill wire.
- Nudge it around with your hand and gently take it out.
- Clean the area with a cloth.
Step 2: Checking the primary ignition circuit of the coil
Once the coil is out it’s time to test it with the multimeter using the following steps:
- Touch the red probe of the multimeter to the positive terminal of the coil. It will be marked +.
- Black probe to the negative terminal of the coil.
- Have someone on the ignition as you hold the probes.
- The multimeter should read a value between 0.5-1.5, but consult your manual for your model’s specific range.
Step 3: Checking the secondary ignition circuit of coil
- Place the red probe in the spark plug boot where the spark plug goes.
- Touch the black probe to a grounded metal surface.
- Have someone turn on the ignition button.
- Multimeter should read between 5K to 30K ohms or consult your manual
How to Test a Stihl Chainsaw Coil With a Multimeter?
Stihl Chainsaws have a two-cycle engine. Engines like these require spark, fuel, and air to run. A faulty ignition coil will affect both cycles, so their maintenance is very important.
- Remove the spark plug from step 2 of how to test the ignition coil.
- Disconnect the kill wire to isolate the coil.
- Take a spark checker attach its clip side to grounded metal and the other to spark plug wire.
- Pull the cord and if you see a spark your coil is good.
In case you don’t have a spark checker you can test your coil using test 01 from above.
Chainsaw Ignition Coil Resistance
Resistance is an ohmic value that represents how the current is flowing. Each battery-powered chainsaw comes with a specific range of resistance mentioned in its manual. Resistance lower than the range signifies a faulty coil and higher resistance represents longer shelf life of the coil.
The resistance of the coil or spark plug can easily be checked with a multimeter. Before that touch the tips of both probes together, if you see value 0 it means it’s good to go.
Resistance of Ignition Coil Testing
- Remove the spark plug.
- Touch probes of multimeter with respective terminals of the coil. Positive terminal with the red probe and negative with black.
- Compare the readings with the ones mentioned in the manual and you’ll have your answer.
Testing Primary Resistance
- Touch the probes to the ends of the terminals of the primary coil.
- The acceptable resistance range is 0.4 – 2 ohms
Testing Secondary Resistance
- Connect the multimeter probes to the terminal of the secondary coil.
- The acceptable resistance range is 6 – 12 ohms.
Have a look at visual demonstration of testing chainsaw ignition coil by IFIXIT4U
Frequently Asked Questions:
What are the common indications of a multimeter?
Here are some of the common indications of a multimeter when you test a chainsaw coil on it:
| Value | Indication |
| 0 | No resistance |
| 1 | Complete resistance |
| 2.5K – 5.0K | Proper Working condition |
If during testing the value stays at 1 it means the coil is faulty.
What are the resistance specifications of the Husqvarna ignition coil?
The recommended ohmic value for a Husqvarna ignition coil start from 2500 to 5150. These values are tested and recommended by insidetheyard.com.
What is the main symptom of an ignition coil going bad?
If the chainsaw stop turns very hot while you are working with it in the middle of the running, it means that the ignition coil is going bad and you need to stop whatever you’ve been cutting with it.
What does resistance in spark plug indicate?
Sometimes resistance in spark plug could be the crux of the problem. And to test that
- Place one probe of Multimeter on the tip of the electrode and the other on a metal surface on the other side
- A value between 5 to 15 ohm means the spark plug is good otherwise faulty.
- If touching the plug anywhere with the probe gives some value it means it means it has resistance. It should not show resistance except the tips.
Some Last Words: How to Test a Chainsaw Coil in 2026?
If the chainsaw while running gets too hot and stops working it means requires a thorough checkup of its coil. When it comes to the ignition coil it could be the spark plug or the coil itself. In both cases, you can either use specific tools or try home testing to point out the problem.
The user manual plays an important role in this scenario since it contains ohmic values which vary from model to model. But if you don’t have it we have covered some generic ranges and you always have the internet.
Gather your tools, put on your gloves and test your coil by following this step-to-step guide.
his personal experience and loves to share their nitty gritty details with his audience.
Although Richard does focus on other home improvement tools, his focus remains on cutting fallen trees or maintaining his backyard via chainsaw tools. He pledges to come up with new knowledge about chainsaws every once in a while.
- 5 Best Reciprocating Saw Blades for PVC in 2026 - July 4, 2026
- 7 Best Professional Jigsaws Tested for 2026 - January 20, 2026
- 7 Best Jigsaws for Home Use in 2026 - January 20, 2026