 Many people admire art and want to do it on their own. Carving a bear out of a log is among one such art. Because it not only gives you aesthetic pleasure but also other people feel proud of you as everyone cannot do that.
Also, you can use this unique talent to earn some money. Keep in mind that art and skill are the things that can always pay you. The paying doesn’t only include money but there is admiration, appreciation, and reverence as well.
Carving a wooden bear with a chainsaw is a unique talent that only a few people have. There are other arts but they are common while this one is unique. Therefore, it can pay you better and you will be admired as well.
So, if you are also interested in this art and have the courage to do so but don’t know how to do it? Here is a complete guide regarding how to chainsaw carve a bear.
Step By Step Guide on How to Chainsaw Carve a Bear?
Before I start telling you the chainsaw carving patterns for the beginner, let me tell you that you need to be careful during the whole process. The first step is to check for your carving chainsaw if it is working properly or not.
The checking of the chainsaw includes; checking its sharpness, check if the chainsaw needs to be oiled, and check if the chainsaw chain is properly tight or not. If any mentioned aspect or other needs to be fixed, first do it.
After that, grab your safety equipment that includes; hearing protection, helmet, gloves, and boots. Done? That’s good!
Now, let’s start with the procedure of carving.
Step 1:
Take a log of about 3 to 3.5 feet in height, it will be large enough to carve a bigger normal size bear.
Place the log on a wood piece and attach the log to the wooden stage with the help of screws.
Mark on the log at the bottom side, leaving 4 to 5-inch space. Your bear carving should be above that mark. This 4 to 5-inch space will serve as the standing of the bear.
Step 2:
Use the widest part of the log for the head. Start cutting the log in a sort of a triangle shape. Use the two wide sides of the triangle for making ears and from the narrow part use it for facial features.
Keep in mind that you don’t need to cut a proper triangle. It is just for making a rough sketch and mind map for your carving.
Also, be careful while making ears. First, there should be an equal gap between the ears. And remember ears are located on the slight backside of the head. Ears are not in parallel with the nose or cheeks, they are behind.
Step 3:
Grab your chainsaw. Make it work and start carving.
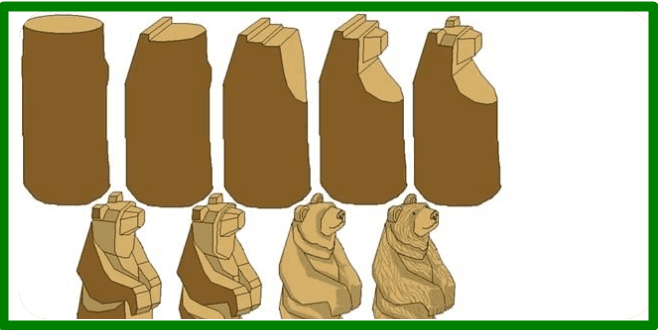
Step 4:
Start cutting from the back of the ears. Cut till the hump of the shoulder. And then move ahead till the standing of the bear.
Step 5:
Get a marker and draw rough-cutting lines for mind mapping. Draw the shape of the mouth, head and leaving behind the space for the ears of the bear. Also draw the cheeks, and paws of the bear so that you don’t feel difficulty while moving the chainsaw.
Step 6:
Start notching the ears. Just make a rough structure of the bear initially.
Step 7:
Make cuts for facial expressions such as nose, mouth, and cheeks from the pointed side of the triangle.
Step 8:
Cut down deep into the neck and making the cuts of legs. Also, make cuts for visible features of arms. After marking arm features it will be easy for you to have the look of the bear. Of course, not a complete one but at least every feature is distinguished and recognizable.
Learn More: How to Carve a Totem Pole with Chainsaw?
Step 9:
Then, make shoulder cuts and separate all the body parts. You will be done with the structure of the bear in perfection.
Step 10:
The next step is furring. It is the most significant step. Here you will make smaller cuts of the whole body. It will make the hairy body of the bear. And it is also a final touching action.
Step 11:
Cut the swap wood at the bottom that we left initially to make the standing of the bear. Make it fair and give the final touch by carving with the chainsaw. This is actually the base of the bear where it stands.
Step 12:
After that, give a final touch to sharpening the facial expressions of the bear. Attach the pair of eyes and also make designing cuts (furring) on the base.
Step 13:
This step is additional and it is for the beauty of the bear. You can paint the bear or you can give it a fiery touch. It will result in creating light and dark patches on the skin.
Paint does not give that real feel as a fiery touch does. And now you are done with bear carving.
Frequently Asked Questions:
How do you cut a bear for beginners?
Start mind mapping, cut the log into a triangle-like shape, but now a proper triangle. For making back and ears use a wide part while for facial expressions use the narrow part. Mark lines for cutting a bear by some rough estimates.
Then, cut the shape of the bear and give it a final shape by furring or painting. And you’re just finished with carving a bear.
What kind of wood is best for chainsaw carving?
Softwood such as cottonwood and ponderosa is best for the bear carving with a chainsaw. The soft is good because it is easy to cut and there will be less cracks in it.
How do you carve a chainsaw step by step?
There are multiple steps that you need to follow or carving a bear. Read the article, all the steps are mentioned. Even if you are a beginner, this is going to help you just give it a read.
How do you carve a bear with a stump?
Carving a bear out of a stump is one of the professional arts. In this article, there is complete guidance regarding the craving of the bear with a stump. You can have a look at it and you will get to know about the answer.
Final Takeaways: How to Chainsaw Carve a Bear?
This article is all about how to chainsaw carve a bear. In this article, patterns, tricks, and steps, everything is mentioned. I hope this is going to be helpful to you. For beginners, it is motivating and helpful.
his personal experience and loves to share their nitty gritty details with his audience.
Although Richard does focus on other home improvement tools, his focus remains on cutting fallen trees or maintaining his backyard via chainsaw tools. He pledges to come up with new knowledge about chainsaws every once in a while.
- 5 Best Reciprocating Saw Blades for PVC in 2026 - July 4, 2026
- 7 Best Professional Jigsaws Tested for 2026 - January 20, 2026
- 7 Best Jigsaws for Home Use in 2026 - January 20, 2026