Learning to use a track saw correctly is one of the best skills a woodworker or DIYer can develop. The tool may look simple, but small setup details make a big difference in accuracy and finish quality. The first time I used one, I underestimated how precise the setup needed to be, until my cuts drifted slightly off-line. Once I understood how to align the track, control the plunge, and manage blade depth, every cut looked clean and effortless. Let’s learn how to set up your track saw, perform clean, safe cuts, and apply a few pro techniques that improve both accuracy and workflow.
Setup & Preparation
Inspect the Track & Zero-Clearance Strip
Before cutting, always check that your track is clean, straight, and free of debris. Even small wood chips can lift the track slightly and cause angled cuts. Inspect the splinter guard or zero-clearance strip on the track’s edge, it should line up precisely with the blade’s path. If it’s damaged or worn, replace it to maintain clean, splinter-free cuts.
Secure a Work Surface & Use Sacrificial Support
Set up on a flat, stable surface such as a workbench or sheet of rigid foam insulation. This gives full support and prevents the material from sagging or pinching the blade. Using a foam or scrap board underneath allows you to cut completely through your workpiece without damaging your table. The saw and track remain steady, which improves both safety and precision.
“A flat, supported surface is as important as the saw itself. It’s what keeps the blade cutting square and smooth,” says Chris Marshall, senior editor at Woodworker’s Journal.
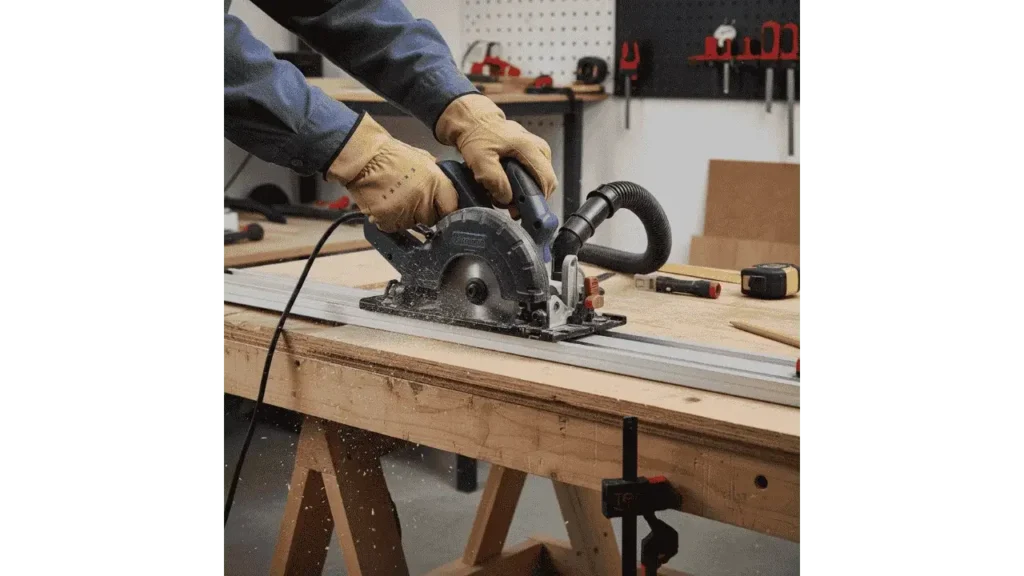
Mark Your Cut Line & Align the Track
Use a reliable straight edge or square to mark your cut line. Place the track so the splinter guard edge aligns exactly with your mark. For long cuts, check both ends before starting to ensure perfect alignment. Depending on your material, you can secure the track with clamps or rely on its non-slip base for smaller cuts.
Related: What is a Track Saw Used for?
Basic Cutting Steps
Set Blade Depth & Bevel (if needed)
Adjust the blade depth so it’s slightly deeper than the thickness of your material, around 1/8 inch extra is ideal. Setting it too deep increases tear-out and stress on the motor. If you’re cutting miters or angled edges, set the bevel angle now, making sure it locks securely in place.
Start the Saw & Make a Scoring Pass (Optional)
Plug in or power on the saw and allow it to reach full speed before beginning the cut. For delicate laminates or veneers, consider making a shallow scoring pass first. This light first pass scores the surface fibers, reducing tear-out when you make the full-depth cut afterward. It’s a small extra step that produces a noticeably cleaner finish.
Plunge & Push Along the Track
Lower the saw smoothly to plunge into the material, keeping a firm grip on the handles. Apply steady forward pressure, let the blade do the cutting instead of forcing it through. Maintain consistent movement along the track, and wait for the blade to stop spinning completely before lifting the saw.
“With a track saw, patience equals precision. Rushing the cut is the fastest way to ruin accuracy,” explains Paul Sellers, master woodworker and instructor.
Variations & Advanced Cuts
Rip Cuts & Crosscuts
Track saws handle both rips and crosscuts effortlessly. For rip cuts, align the track parallel to the grain; for crosscuts, position it square across the panel. Always ensure the material is well supported to prevent binding or shifting during the cut.
Bevel & Angled Cuts
Set the bevel angle using the saw’s scale, then make slow, controlled passes. Angled cuts require more care to keep alignment, especially on long boards. Using a sharp blade helps prevent drag and keeps the edge crisp and accurate.
Cutting Thick or Slab Stock
If the material is thicker than your blade depth, use a two-pass method. Cut halfway through, flip the board, and align the track using the first kerf as a guide. Finish the cut from the opposite side for a clean, accurate edge with no binding or burning.
Tips & Best Practices
Always secure the track before you start cutting. A shifting track is one of the most common causes of uneven cuts. Keep your blades sharp; dull teeth can cause burn marks and increase tear-out. Use a dust extractor to keep your cutting line visible and your workspace clean. Finally, make a test cut on scrap material to confirm depth and alignment before starting on your actual project.
“Sharp blades, firm support, and clean lines, those three details separate rough carpentry from professional work,” says Tom Silva, general contractor from This Old House.
Safety Considerations
Safety should always come first when using a track saw. Wear eye protection, hearing protection, and a dust mask whenever you cut. Keep your hands away from the blade path, and make sure large panels are supported evenly to prevent shifting. Always unplug the saw or remove the battery before changing blades or making adjustments.
You Might Also Like: How to Change a Track Saw Blade?
FAQs | Common Questions About Using a Track Saw
1. How deep should I set the blade on a track saw?
When using a track saw, set the blade depth just slightly deeper than your material’s thickness. This gives a clean cut without damaging your work surface or the track underneath.
2. Do I always need a scoring pass when cutting with a track saw?
Not for every job. If you’re cutting plain plywood or rough lumber, you can skip it. But for delicate veneers, melamine, or painted panels, a scoring pass on your track saw helps prevent edge tear-out.
3. What speed is best when operating a track saw?
A track saw works best at full speed with a steady feed rate. Moving too fast can cause the blade to bind, while too slow a pace may leave burn marks on the wood.
4. Can I use a track saw to cut thick slabs or large boards?
Yes, you can cut thick slabs with a track saw using a two-pass method. Make the first cut halfway through, flip the material, and finish from the other side for a smooth, complete cut.
5. How do I line up a track saw accurately with my cut mark?
To get an exact cut, align the edge of the track saw’s splinter guard with your pencil line. Make sure the track is secured firmly before powering up the saw.
6. Is it safe to plunge a track saw directly into the material?
Yes, as long as the blade is spinning at full speed and your grip is steady. For beginners, it’s safer to start slowly and practice controlled plunges until you’re confident with the motion.
Final Takeaways
Mastering a track saw isn’t about speed, it’s about precision and consistency. Taking a few extra minutes to align the track and set the right depth guarantees smoother, cleaner cuts every time. Once you learn to control plunge depth, feed rate, and support, the track saw becomes one of the most dependable tools in your shop. With practice and safe technique, it will deliver professional results on every project.
his personal experience and loves to share their nitty gritty details with his audience.
Although Richard does focus on other home improvement tools, his focus remains on cutting fallen trees or maintaining his backyard via chainsaw tools. He pledges to come up with new knowledge about chainsaws every once in a while.
- 7 Best Professional Jigsaws Tested for 2026 - January 20, 2026
- 7 Best Jigsaws for Home Use in 2026 - January 20, 2026
- 7 Best Jigsaws for Beginners Tested in 2026 - January 20, 2026