Learning how to cut plexiglass with a jigsaw is a useful skill for homeowners, DIYers, and craft enthusiasts who want clean, precise results without cracking or melting the material. Plexiglass, also known as acrylic sheet, is lighter and safer than glass but requires careful cutting due to its heat sensitivity. Unlike polycarbonate, plexiglass is more brittle, meaning the right setup and technique are crucial. From my own experience, switching from a high-speed cut to a slower, controlled feed made all the difference in achieving smooth, professional results. You’ll learn how to select the correct blade, prepare your work area, perform accurate cuts, and finish the edges cleanly.
Preparation & Workpiece Setup
Choose the Right Plexiglass Sheet & Marking
Start with a clean, undamaged sheet of plexiglass and leave the protective film intact during cutting to avoid scratches. Apply masking tape along the cut line to prevent chipping or marking. Mark your line clearly using a fine marker or scribe. This combination of film and tape keeps the edges smooth and the material surface clear during the process.
Secure the Sheet & Provide Support
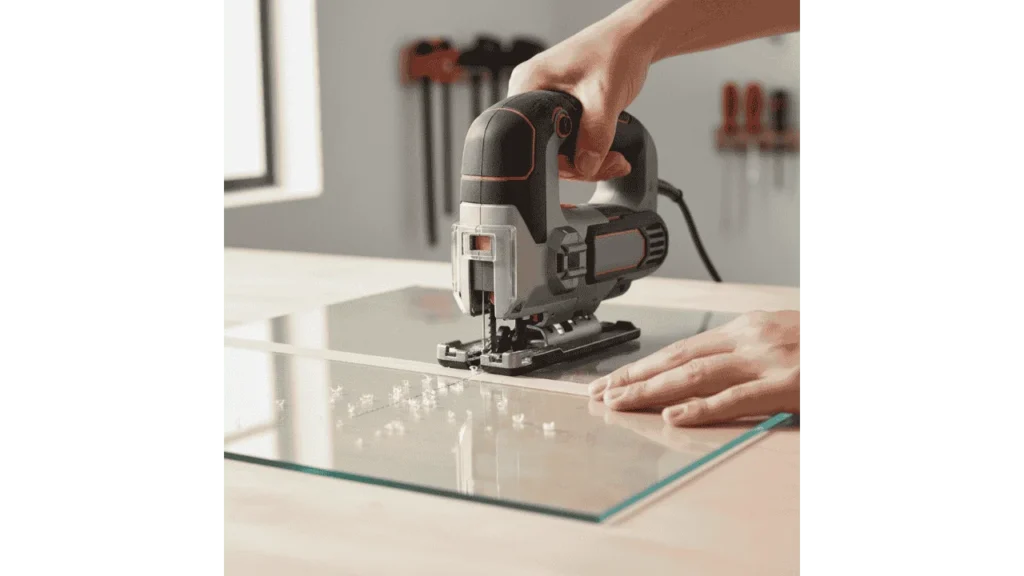
Lay the sheet flat on a stable surface and make sure it’s fully supported underneath to prevent vibration. Clamping the edges will stop unwanted movement, while using a sacrificial board below the sheet helps prevent cracks or flaring at the cut edge. Proper support allows the jigsaw to move smoothly through the plexiglass and reduces stress along the cutting line.
Select Jigsaw Blade & Adjust Settings
Use a jigsaw blade rated for acrylic or plastic, ideally with 7–14 TPI (teeth per inch). Set the jigsaw to low or moderate speed to avoid overheating and melting the plexiglass. Avoid using an orbital setting, as it can cause chipping or irregular cuts. The right combination of blade and speed ensures smooth, even cuts through the material.
“Cutting acrylic is about control, not speed, steady feed and the right blade do more than power ever will,” says Bob Flexner, finishing and materials expert.
Cutting Technique
Starting the Cut & Straight Lines
Align the jigsaw blade with the marked line and let it reach full speed before making contact with the plexiglass. Feed the saw steadily and do not force it forward faster than it can cut. Let the blade guide itself along the line. Keeping consistent pressure and rhythm minimizes vibration and ensures a straight, clean cut.
Curves, Interior Cut-outs & Tight Radii
For interior cut-outs, drill a starter hole large enough to insert the blade through. After threading the blade, carefully follow your marked pattern. For tight curves, use a fine-tooth blade and slow the jigsaw speed to prevent cracking. Move gradually along the curves, maintaining control and avoiding sharp directional changes that can stress the material.
Preventing Chipping, Melting & Cracks
Always use masking tape along the cut line and maintain support under the material. If you see melted shavings sticking to the blade, stop and reduce the saw speed. Using a blade with fewer teeth per inch can also help prevent melting. Feed slowly and evenly, excess pressure leads to chipping and uneven edges.
“When acrylic heats up, it behaves unpredictably. Keep it cool and it’ll reward you with smooth, clean lines,” says Tom Silva, contractor at This Old House.
Finishing the Cut
After the cut is complete, remove the protective film carefully to avoid leaving adhesive residue. Use fine-grit sandpaper or a plastic deburring tool to smooth the edges. Wipe the sheet with a soft cloth to remove dust or static buildup. For added clarity, you can lightly polish the edges with a dedicated acrylic polish, but avoid excessive heat buildup during polishing.
Safety Considerations
Always wear safety glasses and a dust mask to protect against flying acrylic chips and fine particles. Keep the workpiece clamped securely so it cannot shift during cutting, as movement can cause cracks. Ensure the jigsaw’s base plate stays flat on the surface for better control. Avoid forcing the tool or twisting during cutting. Steady feed pressure and clean setup will produce safer and better results.
FAQs
What blade should I use to cut plexiglass with a jigsaw?
Use a blade rated for plastic/acrylic with approximately 7-14 teeth per inch; ensure the blade is sharp and dedicated to plastic for best results.
How fast should I cut plexiglass with a jigsaw?
Set the jigsaw to a lower speed and feed the material steadily without forcing, it’s better to go slower and more controlled when cutting plexiglass with a jigsaw.
Can I cut curves or interior shapes in plexiglass with a jigsaw?
Yes, when cutting plexiglass with a jigsaw for curves or interior shapes, drill a starter hole for interior cuts and use a fine-tooth blade for tight radii, feeding slowly to avoid cracking.
How do I prevent chipping or cracking when I cut plexiglass with a jigsaw?
Support the sheet fully underneath, apply masking tape along the cut line, use a blade with appropriate TPI, and cut at moderate speed to prevent chipping while cutting plexiglass with a jigsaw.
Can I use the same jigsaw blade for plexiglass that I use for wood?
It’s not recommended, blades used for wood often have different geometry and may cause melting or chipping when cutting plexiglass with a jigsaw. Choose a dedicated plastic blade.
Is it safe to cut thick plexiglass sheets with a jigsaw?
Yes, but you’ll need to ensure the sheet is well supported, use a blade suitable for thick acrylic, possibly make slower passes, and be cautious of vibration and heat build-up.
Final Takeaways
Cutting plexiglass with a jigsaw can yield professional, crack-free results when done with the right preparation and technique. Use a low-to-moderate speed, select a plastic-rated blade (7–14 TPI), and secure the sheet firmly to prevent vibration. Feed the blade slowly, avoid excessive pressure, and always support the material beneath the cut. With steady control and proper safety, you’ll achieve smooth, clear edges suitable for home repairs, displays, or craft projects with ease.
his personal experience and loves to share their nitty gritty details with his audience.
Although Richard does focus on other home improvement tools, his focus remains on cutting fallen trees or maintaining his backyard via chainsaw tools. He pledges to come up with new knowledge about chainsaws every once in a while.
- 7 Best Professional Jigsaws Tested for 2026 - January 20, 2026
- 7 Best Jigsaws for Home Use in 2026 - January 20, 2026
- 7 Best Jigsaws for Beginners Tested in 2026 - January 20, 2026