Many DIYers wonder how to cut a smooth, accurate circle using a jigsaw, especially since this tool is often associated with straight or curved freehand cuts rather than perfect rounds. The truth is, with the right setup, blade, and control, a jigsaw can cut circles with surprising precision. Whether you’re working on furniture, decorative panels, or craft projects, understanding how to guide your saw makes all the difference. From personal experience, I’ve found that patience, steady movement, and a reliable jig are the real secrets to clean circular cuts that need little sanding afterward.
Tools and Materials You’ll Need
To cut a proper circle, you’ll need a jigsaw with variable speed and orbital control, along with a narrow, fine-tooth blade designed for curved cuts. Marking tools like a pencil, compass, or string help define the shape, while a drill and bit allow you to make starter holes for interior cuts. Support your workpiece on a sturdy surface or sawhorses, and use clamps to prevent movement during cutting. Optional additions, such as a pivot jig, masking tape, and sandpaper, can make the process smoother and improve the final edge finish. Proper preparation ensures the cut goes exactly where you intend.
Marking and Preparing the Circle
Marking the Cut Line
Begin by marking your circle accurately using a compass or the string-and-nail method. Measure the radius carefully; even a small error here can throw off symmetry later. Once marked, trace over the line clearly so it’s easy to follow while cutting. For interior circles, drill a starter hole just inside the line, large enough for the blade to pass through easily. This helps you start your cut cleanly and stay on track from the very beginning.
“Accuracy starts with your pencil, not your saw, take time marking your circle, and your blade will simply follow the path you’ve already perfected,” says Tom Silva, general contractor at This Old House.
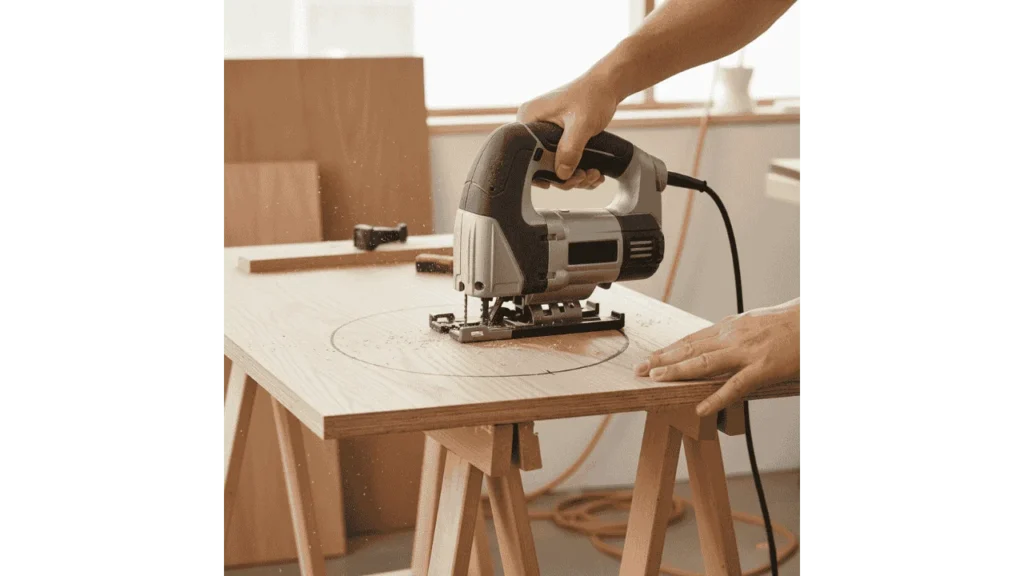
Setting Up the Workpiece
Lay the material flat on a stable work surface and clamp it securely at multiple points. Keep the area beneath your cutting line clear so the blade can move freely. For thinner materials like plywood, veneer, or plastic, sandwiching the piece between two scrap boards helps minimize vibration and prevents splintering. This added stability ensures a smoother, cleaner cut that needs less finishing later.
Blade Selection and Jigsaw Settings
Picking the Right Blade
Choose a narrow, fine-tooth blade specifically rated for curved cuts. These blades have a smaller width, allowing tighter turns and better control around the circle’s radius. Avoid coarse wood blades, as their wide teeth can cause splintering and blade drift. When cutting plastic or acrylic, switch to an acrylic-rated or down-cut blade to prevent chipping or melting along the edge. The right blade choice determines whether your circle turns out clean or jagged.
Adjusting the Saw
Before cutting, disable orbital mode on your jigsaw. Orbital action moves the blade aggressively for fast cutting but sacrifices control, exactly what you don’t want for a circle. Set your speed to a moderate level (around 50–70% of maximum) to reduce chatter or overheating. Make sure your jigsaw shoe is flat and locked securely, as any movement here can tilt your blade and distort your curve.
Methods to Cut a Circle with a Jigsaw
Method 1: Freehand Cutting
Freehand cutting is best for large circles or when precision isn’t critical. Start by aligning your blade with the marked line and let it reach full speed before touching the material. Follow the curve slowly, steering gently rather than twisting the saw sharply. Keep your forward pressure steady and let the blade do the work. Freehand cutting requires practice, a calm pace and firm control help prevent wobbling or veering off the circle.
Method 2: Pivot Jig Cutting (for Perfect Circles)
For more accuracy, use a pivot jig, either store-bought or homemade. Attach it to the jigsaw’s base plate, with a small nail or screw fixed at the circle’s center as the pivot. As you move the jigsaw, the jig ensures that every rotation maintains the correct radius. Keep the jigsaw’s base pressed flat against the surface and move in a smooth, continuous motion. This technique gives near-perfect circles and is ideal for repeated or decorative work.
Method 3: Interior Circle Cut
When you need to cut a hole or internal circle, drill a starter hole along the inside edge of your marked line. Insert the jigsaw blade through it and reconnect the saw. Start slowly and maintain steady control, guiding the blade around the shape with small directional adjustments. Avoid stopping mid-curve; instead, complete the full circle in one continuous pass for the cleanest edge.
Finishing and Smoothing the Circle
Removing Imperfections
After cutting, inspect your edge and use fine-grit sandpaper or a sanding drum to smooth out uneven areas. For perfect precision, trace your rough circle onto a template and use a router with a bearing bit to trim it to an exact diameter. This method is especially useful when your circle needs to fit another part, such as a frame or insert.
Polishing and Edge Treatment
For visible edges, take time to sand and polish thoroughly. On wood, fine sanding and a light sealant will create a professional finish. For acrylic or plastic, use a polishing compound to restore clarity and remove small scratches. The smoother your edge, the more refined your final result looks, especially for decorative pieces.
“A little time spent sanding and polishing turns a rough-cut circle into a finished piece, it’s the difference between functional and flawless,” says Mark Petersen, editor at Pro Tool Reviews.
Common Mistakes to Avoid
Several common errors can ruin a good circle cut. Forcing the jigsaw too quickly can bend or snap the blade, while using a dull or coarse blade produces jagged, uneven edges. Forgetting to clamp the material properly leads to vibration, causing the saw to drift. Another frequent mistake is leaving orbital mode on, which causes aggressive cutting and rough curves. Always support offcuts so they don’t crack near the end of the cut. Each of these small details can make or break your result.
Safety Tips When Cutting Circles with a Jigsaw
Always wear safety goggles and hearing protection, and keep your hands clear of the blade path. Use both hands to control the jigsaw, one on the handle, the other guiding its body for balance. Wait until the blade stops completely before lifting the saw off the material. Make sure your power cord or battery stays outside the cutting radius to prevent tangles. Keeping a clean, stable work area ensures precision and safety in every cut.
FAQs: Common Questions About How to Cut a Circle with a Jigsaw?
Can you cut a perfect circle with a jigsaw?
Yes, with a pivot jig or careful freehand control, you can cut a perfect circle using a jigsaw. A narrow blade and smooth feed make all the difference.
What is the easiest way to cut a circle with a jigsaw?
The easiest way is using a pivot jig that attaches to the jigsaw’s base and rotates around a fixed center point for consistent accuracy.
Do I need a special blade to cut circles with a jigsaw?
Yes, a fine-tooth, narrow-width blade designed for curves prevents binding and allows smoother motion around arcs.
Can I cut a small circle with a jigsaw?
Yes, but use the thinnest blade available and slower speed to navigate tight curves, larger blades can’t handle small radii.
How do I keep the jigsaw from wandering off the line when cutting a circle?
Maintain firm downward pressure on the saw shoe and guide slowly. Avoid twisting the tool; let the blade naturally follow the curve.
Should I use orbital action when cutting a circle with a jigsaw?
No, turn off orbital action for smoother and more precise curved cuts; it’s best reserved for fast straight cutting.
Do I need to sand the edge after cutting a circle with a jigsaw?
Yes, light sanding or edge trimming removes tool marks and ensures a professional finish, especially if the circle is part of a visible surface.
Can I use a jigsaw to cut circles in metal or plastic?
Yes, but use a blade rated for that material, slow speed, and proper support, especially important with acrylic or thin sheet metal.
Final Takeaways
Cutting a circle with a jigsaw is less about power and more about control. The right marking, setup, and blade make it easy to achieve clean, accurate results. Work slowly, disable orbital mode, and support your material well. For consistent precision, use a pivot jig, it keeps your radius perfect from start to finish. With the correct tools, patience, and steady guidance, a jigsaw can deliver smooth, perfectly rounded cuts in wood, plastic, or similar materials, giving your DIY projects a polished, professional look.
his personal experience and loves to share their nitty gritty details with his audience.
Although Richard does focus on other home improvement tools, his focus remains on cutting fallen trees or maintaining his backyard via chainsaw tools. He pledges to come up with new knowledge about chainsaws every once in a while.
- 7 Best Professional Jigsaws Tested for 2026 - January 20, 2026
- 7 Best Jigsaws for Home Use in 2026 - January 20, 2026
- 7 Best Jigsaws for Beginners Tested in 2026 - January 20, 2026