Knowing how to change a reciprocating saw blade is essential for efficient and safe cutting. In my experience, swapping a blade quickly and correctly can save you hours on a renovation or DIY project. If your blade is dull, damaged, or the wrong type, it can slow your work, damage materials, or even strain the saw. I’ve found that learning the correct process not only speeds up your tasks but also ensures cleaner cuts and extends both the blade’s and the saw’s life. The steps differ slightly between corded and cordless models, but mastering them makes every blade change smooth and safe, preventing unnecessary mistakes while working.
Tools and Safety Gear Needed
Tools
Most modern reciprocating saws feature a tool-free blade change system, allowing you to swap blades quickly without additional tools. For older or budget models, you may need an Allen wrench or screwdriver to loosen and tighten the blade clamp. In my experience, having the correct tool ready before starting makes the process smooth and prevents frustration during installation.
Safety Gear
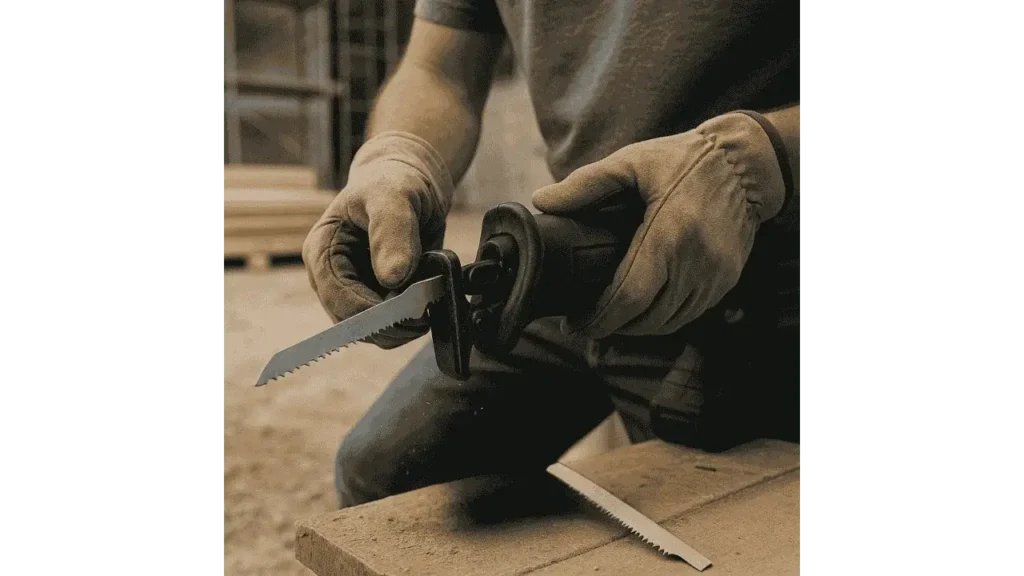
Always wear gloves to protect your hands from the sharp teeth of the blade and safety goggles to shield your eyes from flying debris. Before you touch the blade, make sure the saw is unplugged or the battery is removed.
“Never attempt to change a blade while the saw is powered. Safety is always the first step,” advises Jack Harris, a professional contractor.
Types of Blade Mounts on Reciprocating Saws
“Understanding the type of blade mount your saw has makes the process faster and safer,” says tool technician Sarah Lopez.
Tool-Free Blade Clamp
Tool-free systems typically use a lever or twist-lock mechanism. You can release and secure blades quickly, making swaps efficient during projects. These clamps hold the blade firmly in place while cutting, ensuring safety and precision.
Manual/Keyed Blade Clamp
Older or budget saws often use a manual or keyed clamp. You’ll need a wrench or hex key to loosen and tighten the clamp. Though slightly slower, these clamps provide a secure hold when properly tightened, and they work well for all types of blades.
Step-by-Step Guide to Changing a Reciprocating Saw Blade
Step 1: Power Off and Remove Battery/Unplug
Always disconnect the power source before handling the blade. For cordless models, remove the battery; for corded saws, unplug it from the outlet. This precaution prevents accidental starts and ensures your safety while changing the blade.
Step 2: Release the Old Blade
If your saw has a tool-free system, pull or twist the lever to unlock the blade. For manual clamps, loosen the clamp using the correct wrench or hex key. Make sure the blade is fully unlocked before attempting removal.
Step 3: Remove the Blade
Carefully pull the old blade straight out of the clamp or slot. If the blade is reusable, store it safely; if it’s worn or damaged, dispose of it properly. Handling the blade with care reduces the risk of injury.
Step 4: Insert the New Blade
Ensure the teeth face the correct cutting direction, usually forward. Slide the blade fully into the clamp or slot. Proper orientation is crucial for effective and safe cutting.
Step 5: Secure the Blade
For tool-free systems, snap or twist the lever back into the locked position. For manual clamps, tighten the clamp with a wrench or hex key until the blade is firmly held. A secure blade prevents wobbling and potential accidents.
Step 6: Check Blade Alignment
After installation, wiggle the blade slightly to ensure it’s firmly seated. Make sure it moves straight without wobbling.
“A blade that isn’t aligned correctly can damage material and reduce cutting efficiency. Always double-check alignment before starting,” says David Miller, a tool expert.
Tips and Best Practices
Always use the correct blade for the material you’re cutting. Clean the blade and clamp before installation to ensure a snug fit. Regularly inspect the clamp mechanism for wear and replace worn parts to maintain secure holding. Store spare blades safely to avoid accidents and keep them ready for future use.
Troubleshooting Blade Issues
“Most blade problems are caused by improper seating or orientation,” explains Jack Harris.
If the blade slips, check the lever or clamp for proper tightening. If the blade won’t insert, verify that it’s correctly oriented and the slot is clean. A wobbly blade may be bent and should be replaced to maintain safety and performance.
FAQs
Q: How do you change a reciprocating saw blade safely?
Always unplug the saw or remove the battery, wear gloves, and follow the saw’s blade-release mechanism instructions.
Q: Can all reciprocating saws use tool-free blade changes?
No, older or budget models may require a wrench or key to loosen the clamp. Always check your model’s instructions.
Q: How do I know which way to insert a reciprocating saw blade?
The teeth should face the direction of cutting, usually forward from the handle toward the material.
Q: What should I do if the reciprocating saw blade keeps slipping?
Check that the clamp or lever is fully engaged and tighten any screws or bolts as required. Replace worn blades or clamps if necessary.
Q: How often should I change a reciprocating saw blade?
Change the blade whenever it becomes dull, bent, or damaged. Using a sharp blade ensures safe and efficient cutting.
Final Takeaways
Changing a reciprocating saw blade is quick, safe, and simple when done correctly. Modern tool-free systems make swaps even easier, but knowing how to handle older clamps is equally important. Proper blade installation ensures effective cutting, prolongs tool life, and keeps your projects moving efficiently.
his personal experience and loves to share their nitty gritty details with his audience.
Although Richard does focus on other home improvement tools, his focus remains on cutting fallen trees or maintaining his backyard via chainsaw tools. He pledges to come up with new knowledge about chainsaws every once in a while.
- 7 Best Professional Jigsaws Tested for 2026 - January 20, 2026
- 7 Best Jigsaws for Home Use in 2026 - January 20, 2026
- 7 Best Jigsaws for Beginners Tested in 2026 - January 20, 2026