Few things slow down a project faster than a dull or damaged blade. Learning how to change a miter saw blade correctly is one of those simple skills that keeps your cuts sharp and your tool running smoothly. It only takes a few minutes, but the difference in performance is immediate and worth it every time.
Mark Jensen, Woodworking Instructor says,
“The secret to getting professional results isn’t fancy tools, it’s a sharp, properly installed blade. A clean change keeps your saw working like the day you bought it.”
What Tools and Safety Gear Do You Need Before Starting?
Before starting, gather everything you’ll need to change your miter saw blade safely. A wrench or Allen key, a new blade that matches your saw’s size and arbor, and a clean workspace are essential. Always wear gloves and safety glasses for protection, and make sure the saw is completely unplugged, this step isn’t optional. I always take a moment to wipe down the saw and remove sawdust before installing the new blade; it keeps everything visible, secure, and properly aligned when reassembled.
Linda Cooper, Workshop Safety Specialist explains,
“Most accidents happen because people skip the basics, like unplugging the saw or wearing gloves. Slow down, prepare your space, and the rest becomes simple.”
You Might Also Like: What is a Miter Saw?
Step-by-Step Guide: How to Change a Miter Saw Blade by Hand
Changing a miter saw blade sounds technical, but once you’ve done it once, it becomes second nature. Follow these steps carefully, and you’ll have your saw ready in no time.
Step 1: Disconnect the Power Source
Unplug the saw or remove the battery completely before doing anything else. Safety always comes first, and this simple step prevents accidental starts that could cause serious injury.
Step 2: Lock the Spindle and Raise the Blade Guard
Find the spindle lock button near the blade housing and press it to keep the blade from spinning. Lift or retract the blade guard to expose the arbor bolt. Some models may require loosening a small screw or latch to access it fully.
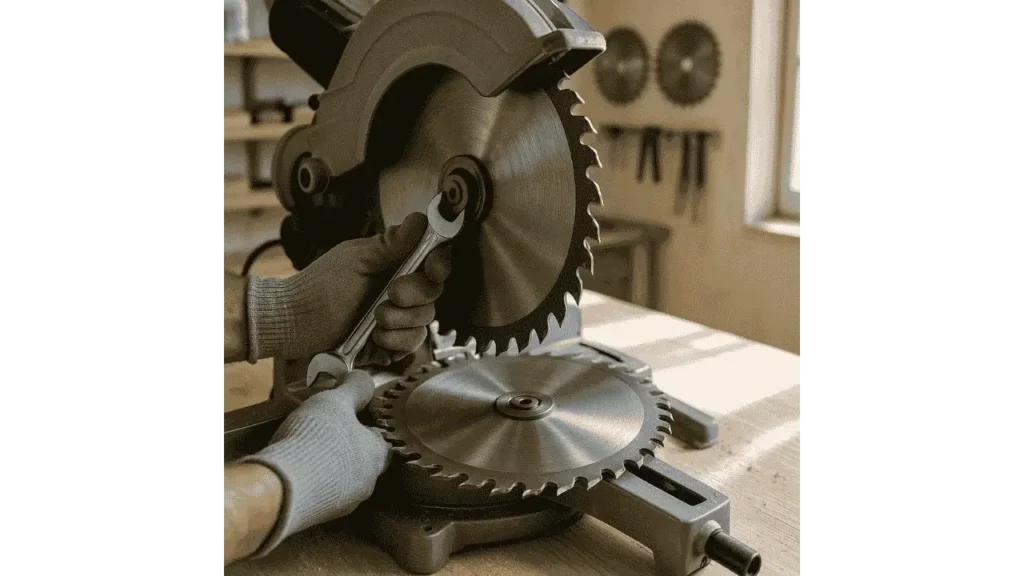
Step 3: Loosen and Remove the Arbor Bolt
Insert your wrench into the bolt and turn it in the correct direction. Remember that most miter saws have reverse-threaded bolts, meaning you’ll need to turn clockwise to loosen it. Hold the blade steady with one hand (wear gloves) or wedge a small piece of wood against the teeth for stability.
Step 4: Remove the Old Blade and Flanges
Once the bolt is loose, carefully remove it along with the outer flange washer. Slide the old blade off the arbor slowly, keeping your fingers away from the teeth. Check the inner flange for dirt or rust and clean it before installing the new blade.
Step 5: Install the New Blade in the Correct Direction
Before sliding the new blade onto the arbor, make sure the teeth face the correct cutting direction, usually toward the front of the saw. Most blades have arrows showing the proper rotation. Align it perfectly with the arbor hole and set it into place.
Step 6: Tighten the Arbor Bolt and Lower the Guard
Reinstall the outer flange and thread the bolt back onto the arbor. Hold the spindle lock again and tighten the bolt securely, but don’t overtighten, it only needs to be firm enough to stay in place. Lower the blade guard once everything feels snug and even.
Step 7: Check Blade Alignment and Spin Test
Before powering up, spin the blade by hand to make sure it moves freely and doesn’t rub against the guard or flange. It should rotate smoothly without any resistance or wobble.
Ryan Porter, Tool Repair Specialist says,
“After installing a new blade, I always do a manual spin check. It’s a small step, but it tells you instantly if the alignment is perfect before you ever power up.”
Related: How to Sharpen a Miter Saw Blade?
Common Mistakes to Avoid When Changing a Miter Saw Blade?
A lot of people damage their miter saws simply by rushing the blade change. One small slip, like installing the blade in the wrong direction, can ruin your next few cuts. Make sure the arrow on the blade matches the saw’s spin before securing it. Don’t overtighten the bolt either; it only needs to be snug, not forced. Skipping a quick cleanup or touching the teeth directly might seem harmless, but over time it dulls the blade and affects accuracy. Take it slow, keep everything clean, and your saw will reward you with smooth, steady performance.
How Can You Maintain a Miter Saw Blade After Replacement?
Once you’ve learned how to change a miter saw blade, keeping it in good condition is just as important. Clean the blade after every few uses to prevent resin or pitch buildup, and avoid cutting through nails or hidden screws that can chip the teeth. Always let the saw reach full speed before touching the material, forcing it too soon dulls the edge quickly. Store extra blades flat or hanging in a dry place to prevent rust or warping. Regular care keeps your miter saw running smoothly, delivering cleaner, more accurate cuts every time.
Recommended Reading: What is a Miter Saw Used For?
FAQs About Changing a Miter Saw Blade
How often should I change my miter saw blade?
It depends on how often you use it, but typically every few months for frequent use or when you see cutting issues.
Can I replace a miter saw blade myself?
Yes, it’s simple and safe as long as you follow proper steps and disconnect power first.
Which way should the blade teeth face?
Teeth should face the direction of the blade’s rotation, usually forward toward the operator.
Do I need special tools for blade replacement?
Most saws come with a wrench for the arbor bolt, but any appropriately sized wrench will do.
Should I replace the washers with the blade?
Not always, but inspect them each time. If they’re worn, rusted, or warped, replace them immediately.
Final Takeaways:
Mastering how to change a miter saw blade is about more than maintenance, it’s about precision and safety. Once you’ve done it a few times, it becomes second nature and keeps your saw working at its best. A clean swap and regular checks are all it takes to get professional results with every cut.
his personal experience and loves to share their nitty gritty details with his audience.
Although Richard does focus on other home improvement tools, his focus remains on cutting fallen trees or maintaining his backyard via chainsaw tools. He pledges to come up with new knowledge about chainsaws every once in a while.
- 7 Best Professional Jigsaws Tested for 2026 - January 20, 2026
- 7 Best Jigsaws for Home Use in 2026 - January 20, 2026
- 7 Best Jigsaws for Beginners Tested in 2026 - January 20, 2026