An electric pole saw arrives in a few tidy pieces: the mini-chainsaw head, a telescoping pole, and a pair of handles, but the way those parts lock together determines whether you enjoy confident pruning or flirt with disaster. Factory engineers design the coupling points to be foolproof, yet a single misaligned collar or untightened screw can send a spinning chain out of control. What follows is a step-by-step walk-through that respects the tool’s built-in safety systems while guiding you from box to ready-to-cut in just a few minutes.
Required Safety Gear
Before you even crack open the carton, pull on cut-resistant gloves, wraparound eye protection, and sturdy work boots. A lightweight pole saw may look harmless compared with a ground saw, but the elevated chain still generates kickback forces and wood chips that can injure the unprepared.
Unpack and Inspect Every Component
Lay the entire kit on a bench and confirm that you have the chainsaw head, each pole section, mounting collars, fasteners, bar-and-chain oil reservoir cap, and user manual. Arborist-trainer Kyle Mercer emphasizes,
“Missing a single washer can mean the pole loosens under vibration; always inventory first so you’re not improvising hardware at height.”
A quick inspection also reveals any shipping damage, cracked plastic housings or bent locking pins warrant an immediate return rather than risky use.
Attach the Pole to the Chainsaw Head
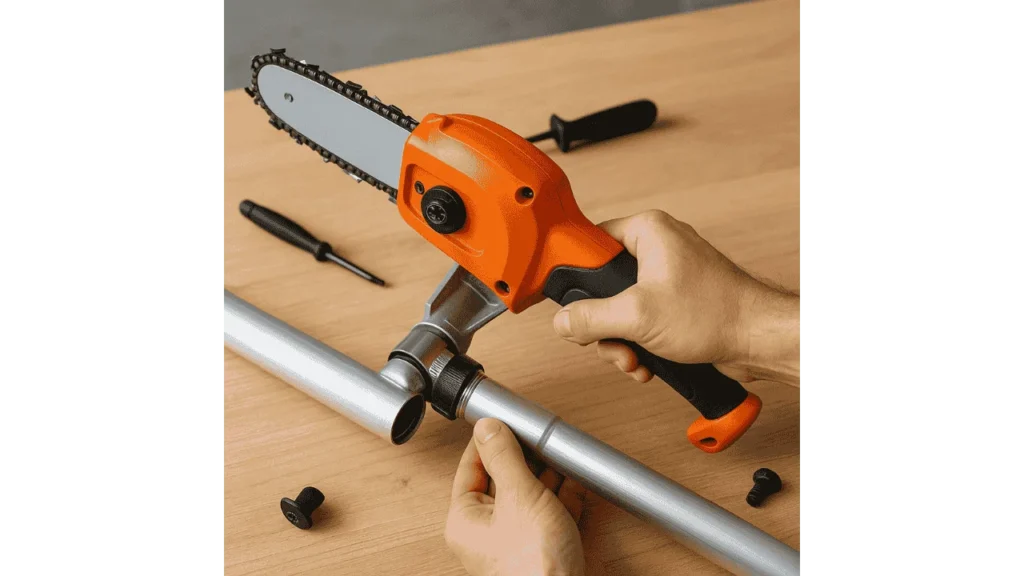
Hold the pole’s upper end so its quick-release holes align perfectly with the receiver on the saw head. Push the two together until you hear a definitive click; if your model uses a threaded collar, twist it firmly until hand-tight, then add a half-turn with the supplied wrench. Tug gently to verify the joint will not separate when raised overhead.
Install the Rear Handle and Adjust Pole Length
Slide the rear handle into the lower pole section, ensuring the safety trigger wire routes cleanly without pinches. Engage the locking lever or screw until the handle no longer shifts under pressure. Next, unlock the telescoping collar, extend the pole only as far as your cut requires, and twist-tighten the collar so the sections cannot telescope unexpectedly.
Mount the Guide Bar and Chain
If your unit ships without the bar installed, remove the sprocket cover, slip the saw chain around the drive sprocket and along the guide-bar groove, and refit the cover. The chain teeth must point forward along the top run, an easy detail to misorient in poor lighting. With the bar nose lifted slightly, turn the tension screw until the chain hugs the bar yet still slides by hand.
Add Bar-and-Chain Oil
Fill the translucent reservoir with the manufacturer’s recommended lubricant and reinstall the cap securely. Veteran mechanic Rita Salazar advises,
“A dry chain can overheat in sixty seconds; topping the oil tank before every use is as critical as sharpening the cutters.”
Perform Final Safety Checks
Activate the chain brake to confirm it locks the chain instantly, squeeze and release the throttle trigger to ensure the lockout lever functions, and scan the pole for loose fasteners or cracked insulation. Verify that the ventilation slots on the motor housing are unobstructed and that the cord (for plug-in models) or battery pack (for cordless units) seats firmly with no wobble.
Test the Assembled Pole Saw
Position the bar clear of any objects and squeeze the trigger, letting the chain spin up to full speed. Listen for smooth rotation and an even oil splatter on the bar tip, evidence that the oiler is working. Only then should you lift the saw to a branch, keeping the chain at full rpm before commencing the cut to avoid stalling or kickback.
Conclusion
Assembling an electric pole saw is straightforward once you respect each locking collar, tension screw, and safety switch designed into the tool. Proper engagement of every joint and a disciplined pre-use check transform a box of parts into a dependable pruning ally. Should anything feel loose, bind, or leak during assembly, stop and consult the manual or your dealer before powering up. A pole saw that clicks together correctly on the ground will reward you with safer, smoother cuts when you’re fifteen feet up in the canopy.
his personal experience and loves to share their nitty gritty details with his audience.
Although Richard does focus on other home improvement tools, his focus remains on cutting fallen trees or maintaining his backyard via chainsaw tools. He pledges to come up with new knowledge about chainsaws every once in a while.
- 7 Best Professional Jigsaws Tested for 2026 - January 20, 2026
- 7 Best Jigsaws for Home Use in 2026 - January 20, 2026
- 7 Best Jigsaws for Beginners Tested in 2026 - January 20, 2026