Adjusting chainsaw tension is a crucial part of the tool’s maintenance. A loose chain can reduce cutting performance and increase the risk of kickback. Whereas a tight chain can cause damage to the saw’s bar and chain. However, adjusting the chain is a simple task that anyone can do at home with just a few tools.
In this article, I’ll share the step-by-step process of adjusting chain tension on a chainsaw, including identifying the tensioning system. After reading the guide, you’ll be able to keep your saw running safely and smoothly. So, let’s get started.

How to Adjust Chainsaw Tension?
Adjusting a chainsaw tension includes finding the right tensioning system for a chainsaw and loosening its bar nuts. Followed by using the tensioning screw to adjust the chain tension, checking the chain tension with a tension tool, and then tightening the bar nuts back up.
Adjusting Chain Tension By Hand
Here’s how to adjust the chain tension on a saw manually:
Step 1: Switch Off the Tool
Before adjusting the saw’s chain, turn the tool off and let it cool down. This will ensure the saw is safe to begin work on.
Step 2: Find the Bar Nuts
Find the bar nuts. They are typically located on the side of the saw close to the bar. They are usually hexagonal in shape and can be loosened with the help of a wrench.
Step 3: Loosen the Bar Nuts
Use the wrench to loosen the bar nuts by turning them counterclockwise. Simply loosen them enough to adjust the tension of the chain. So don’t remove them altogether.
Step 4: Adjust the Tensioning Knob
Find the tensioning knob or screw on the saw’s bar. Turn the screw clockwise with the help of a screwdriver to tighten the chain or counterclockwise to loosen it. It’s essential to adjust the chain tension to the correct measurement using the abovementioned chain hang, chain pull, or bar methods.
Explore: Best Chainsaw Holders
Step 5: Check the Chain Tension
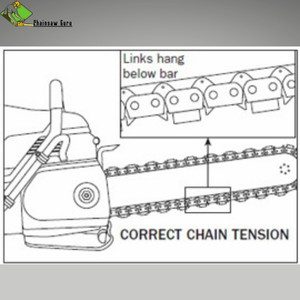
Check the chainsaw tension by pulling on the chain with your hands. Pull on the chain in the middle of the bar. The chain should be tight enough not to sag but loose enough that you can pull it away from the bar with some effort.
Step 6: Tighten the Bar Nuts
Once you’ve adjusted the chain tension, use the wrench to tighten the bar nuts by turning them clockwise. Ensure they are sufficiently tightened to secure the saw’s bar in place but not so tight that the bar can’t move. Once you’ve tightened the nuts, recheck the chain tension to ensure it is tightened correctly.
Adjusting Chain Tension With Tensioning Tool
Here’s how to adjust the chain tension on a saw using a tensioning tool for accurate tightening:
Step 1: Find the Tensioning Screw
Find the tensioning screw on the chain’s side, close to the guide bar. It’s typically in a flat-head screw shape.
Step 2: Place the Tensioning Tool
Once you’ve located the bar nuts, place the tensioning tool on the chain before the guide bar. The device should be perpendicular to the chain, and the arrow on it should point toward the front of the saw.
Step 3: Check the Tension
Remove the tensioning tool. The correct tension of a chain on a saw can vary. But the general range is between 0.020 and 0.050 inches of deflection when pushed or pulled at the center of the bar.
Step 4: Tighten the Chain
Use the tensioning tool to tighten the chain until the pointer on the device indicates the correct tension. The proper tension will vary depending on the saw model and chain size, so consult the manufacturer’s manual for accurate tension measurement.
Once you’ve adjusted the chain tension, use the tensioning tool again to check the chain tension for an accurate measurement.
Tools Required for Chainsaw Chain Adjustment
Adjusting the chain on a saw requires a few tools. Here’s what you’ll need:
Wrench
A wrench is necessary to loosen and tighten the nuts holding the saw’s guide bar in place. The wrench size you’ll need will depend on the saw’s model, but typically it will be a 4mm, 5mm, or 6mm wrench.
Screwdriver
You’ll also need a screwdriver to adjust the saw’s tensioning screw. The type of screwdriver required will depend on the saw’s model, but a flat-head screw is usually sufficient.
Chainsaw Tension Tool
You’ll need a specialized chainsaw tension tool to measure the chain’s tension. It’s not compulsory, but it can provide accurate measurements rather than checking the tension by pulling on the chain.
Gloves and Goggles
Always wear protective gear when working on a chainsaw. Gloves will protect your hands from cuts and scratches, while goggles will guard against flying debris.
FAQs
What is the correct tension for a chainsaw chain?
The correct tension for a chain saw chain depends on the tool’s model and the chain size. Therefore, it’s important to consult the manufacturer’s manual for the correct tension measurement. In general, a properly adjusted chain should be tight against the guide bar but still able to move freely.
If the chain is too loose, it can slip off the bar. Whereas if it’s too tight, it can lead to excessive wear and tear on the bar. You can check the chain tension by pulling the chain away from the bar or using a tensioning tool to measure the chain tension accurately.
How do you tighten the tension on a chainsaw?
To tighten the chain on a saw, use a wrench to loosen the bar screws on the tool’s cover. Find the tensioning screw on the saw and use a tensioning device to determine the current tension of the chain. Tighten the tensioning screw to increase the tension or loosen it to decrease the tension.
Proceed with pulling on the chain or use the tensioning tool after adjustment to check whether the chain is tightened accurately. The chain should be tight against the guide bar but not so much that it can’t move freely. Then tighten the bar nuts in place, so the saw cover is snug against the body but not so tight that the chain can’t move at all.
Can you over-tighten a chainsaw chain?
Yes, it’s possible to over-tighten the chainsaw chain, but it’s not recommended at all. Over-tightening can lead to excessive wear and tear on the chain and guide bar, causing the chain to break.
Moreover, an over-tightened chain can put undue stress on the saw’s engine, forcing it to work hard and resulting in premature wear and damage to the tool. When adjusting the tension on the chain, it’s crucial to strike the right balance.
Tighten the chain sufficiently to stay on the bar and loose enough to allow proper saw movement. Follow the manufacturer’s recommended tension specifications from the manual for appropriate chain tightening.
Why does my chain keep loosening on my chainsaw?
There are several reasons why the chain on your saw keeps loosening. Due to regular use, the chain on your saw can stretch, loosening it over time. A worn sprocket can also cause it to sag.
The sprocket is part of the saw that engages with the chain; if it is damaged or worn out, it may loosen the chain. If the nuts that hold the bar in place are loose, the bar can move around, causing the chain to sag. Or if the chain is not tightened correctly, it can loosen.
Final Thoughts
Learning how to adjust chainsaw tension is an important skill for every saw operator. With the proper tools and techniques, it is a simple task that anyone can do at home. You can prevent damage to the saw and ensure its safe and efficient operation by regularly adjusting its chain tension according to its manufacturer’s specifications.
Just remember to use a tensioning tool or check the tension by pulling at the chain. Following the steps mentioned above and the tips will enable you to confidently and safely adjust the chain tension on your saw and keep it in optimal working condition.
- 5 Best Demolition Reciprocating Saw Blades for 2026 - July 9, 2026
- 5 Best Compact Portable Reciprocating Saws for 2026 - July 9, 2026
- 5 Best Reciprocating Saws Under $100 in 2026 - July 8, 2026